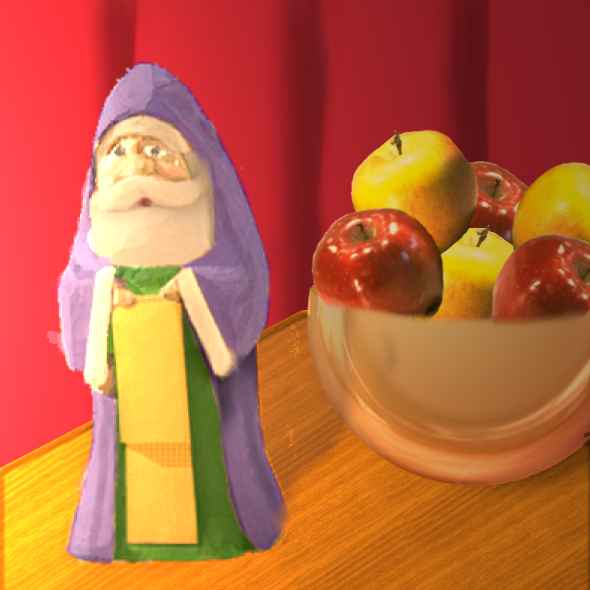
Manipulation Challenge #7
What I Did
Made new transparent image 600 X600
Drapes
1. Using Flood Fill tool with foreground color set at #AC2838, I filled the background.
2. Using Freehand tool set to point to point, I drew off section for first fold. Then going to Selection>Invert, I inverted selection.
3. Using Effect>3D>DropShadow (Settings: Vertical-1, Horizontal- -36, Opacity-35, Blur-32, Color-Black), I created shadow for fold in drapes. Go to Selections>Select None. I repeated steps 2 & 3 two more times to get the 3 folds.
4. Because this looked too sharp, I used the Retouch>Smudge tool set large enough to cover shadow and ran up and down fold a couple of times . Note: I'm sure there's a better way, but I'm new at this and don't know it.
Table
1. Create new layer titled "Table".
2. Using Freehand tool set to point to point, draw table.
3. Using Flood Fill with Style set on Patterns and using Stained Wood, and adjusting the angle to match the angle of the table, I filled it.
4. Go to Selection>Modify>Contract, I contracted 10 pixels.
5. Go to Effects>Outer Bevel and choose the quarter circle set at 10, to get the rounded edges.
6. I then used the Crop tool to barely crop the sides and bottom in order to get rid of the bevel there.
At this point I went to Layer Palette , right clicked on one of the layers, chose Merge>MergeVisible. This became my background. Minimize this for the present to work on Santa and after he is completed he can be added to the background.
Santa
1. Make new transparent image 200 X 400.
2. Copy (Ctr +C) original and paste as new layer (Ctr +L) onto transparent image. I named this layer Orig. Santa (Minimized old image)
3. For ease in working I used FloodFill and colored the transparent layer a lime green for easy visibility while working. This will be erased later.
4. Using Magic Wand set at Tolerance 30, selected Santa. Holding shift key down , I kept selecting areas until entire Santa was enclosed with marching lines. (Some of the boards ended up being selected too.)
5. Going to Selections> Invert, I inverted selection.
6. Using Eraser, I then erased all areas around the Santa.
7. Then to clean up....I went to Selections>Select None to deselect everything.
8. I then carefully erased boards.
9. Made a new Layer named Robe and using Freehand tool set on Point to Point, I drew around the areas I wanted to color blue.
10. Using the Flood Fill with opacity set at 50 and my color set to solid and color as #2F24C2, I filled the selection. Then go to Selections>Select None. Note: Since the face was enclosed with the selection and therefore now blue, I again used the Freehand tool and outlined the face, erased the blue, and again went to Selections>Select None.
11. Again using Freehand tool I outlined the areas to be done in green and with Flood Fill tool on same setting but with color #008000, filled the green area and then deselected as before.
12. For the hanging cloth, the same procedure was used with the color being #F2A62E and Texture set on Dither 75pct.
13. The same procedure was followed for the areas in white, but the texture was removed.
14. Again follow the same procedure for the beard and mustache which was done in gray, color
15. Eyes were painted using Paint Brush and first white, then a bluish gray for irises.
16. Mouth was painted using Paint Brush and a deep rose color then a dark gray in center.
17. Cheeks were painted using Paint Brush with Opacity set at 30 and then the Retouch>Smudge was used to blend.
To make it more 3 dimensional drop shadows were added at appropriate places using the Freehand tool or the Magic Wand to select areas then the Effect>Drop Shadow. At times the selection was inverted to get desired shadow and I just played with settings to get the shadow effect I liked. I also used the Retouch>Smudge tool to blend some areas.
When you are satisfied with Santa go to the lime green background layer and erase. After erasing lime green color, right click on a layer in Layer Palette and choose Merge>Merge Visible.
At this point I saved Santa as a tube so that I could easily adjust size. Click on File>Export>Picture Tube.
Santa is now ready to place on the table adding new layer, clicking on Picture Tube, selecting your Santa (I used 150%) and clicking on picture. Use the Mover tool to position him where you want him. Go to Effects>3D>Drop Shadow and create your drop shadow.
Bowl of Apples
Another layer was opened and using tubes I had, I created the bowl with apples.
To Complete Picture
Right click on a layer. Choose Merge>Merge Visable.
To highlight Santa a little more, I chose to illuminate. To do this go to Effects>Illumination>Lights. I played around with lights until I was pleased. I ended up with settings of:
