Manipulation Challenge #5
What I Did
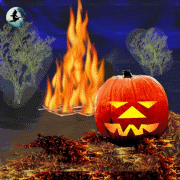
The Pumpkin
I first resized pumpkin to half size. Then I made new image with transparent background and copied picture onto a new layer (named Pumpkin). For better visibility I painted transparent background a sky blue color (to be erased later). I then erased all extraneous areas around pumpkin on the pumpkin layer.
With this done, using my lasso tool, I drew facial features and erased within the selection.
On a new layer(called Features), inserted between background and pumpkin, I then used the Flood Fill tool with Style set on Gradient and using the Autumn gradient set to the circle and inverted. Using the Mover tool, I slid this layer down until the yellow was centered slightly below the nose and then erased all areas around pumpkin.
To add a bit more contrast, I darkened "pumpkin" layer, brightened the "features" layer and used the Retouch>Smudge tool to bring some more yellow up towards the eyes.
The Background
I erased sky blue layer from original transparent layer and flood filled with a Dark Blue Sky Background I had. Then with Paint Brush I painted the horizon line and below black. I then changed to a dark brown and painted in the central area. I inserted the .gif of the witch and used a tube for the bare trees. They didn't stand out enough so using Magic Wand I selected them and first lightened: then not satisfied with that used a light yellow to color wash them.
The Foreground (Straw)
I searched through some pictures until I found one with some straw in it. Selected a portion of the straw and placed on a transparent background and then converted to a tube. Then using tube and resizing it to fit my needs I laid down a layer of straw on a new layer (labeled STRAW) which I moved behind the pumpkin.
Then deciding there needed to be some in front of the pumpkin and covering the bottom of it a bit.... I made another layer (labeled FRONT STRAW) and put it in front of pumpkin.
It was necessary to darken the straw a bit using Colors>Adjust>Darken I darkened it a bit.
The Bonfire
This was done in 3 layers.
First was "twigs" which I did using a tube I had.
Second was fire behind twigs which was again with a flame tube
Last I put a few licks of flame on front of twigs and erased any that went below twigs.
Exported as jpeg file at 60
The Animation
This consisted of 3 jpeg files. They were all the same except for flames.
Image 1 was the first picture I did above.
Image 2 was obtained by taking .psp file of above picture. Erasing both flame layers and putting more flames in. This was again exported as .jpeg file at 60.
Image 3 was done the same way as Image 2.
Then proceeded to Animation Shop 3 and using the wizard loaded all 3 jpeg files and animated.
